Litehouse Create TRANSITIONS
In this tutorial you can find the steps on how to add transitions to the story.
You can easily animate elements in a Litehouse Create story with the addition of a simple custom code snippet.
Note: Transitions are not visible in preview mode. The story needs to be published to view animations. Also, animations are switched off on mobile devices to enhance performance.
1. Add a Code Block anywhere in the story
2. Choose a Script
You can choose either an immediate or a delayed transition for the type of transition you want (immediate or delayed) and insert it into your Code Block
Script block for immediate effects
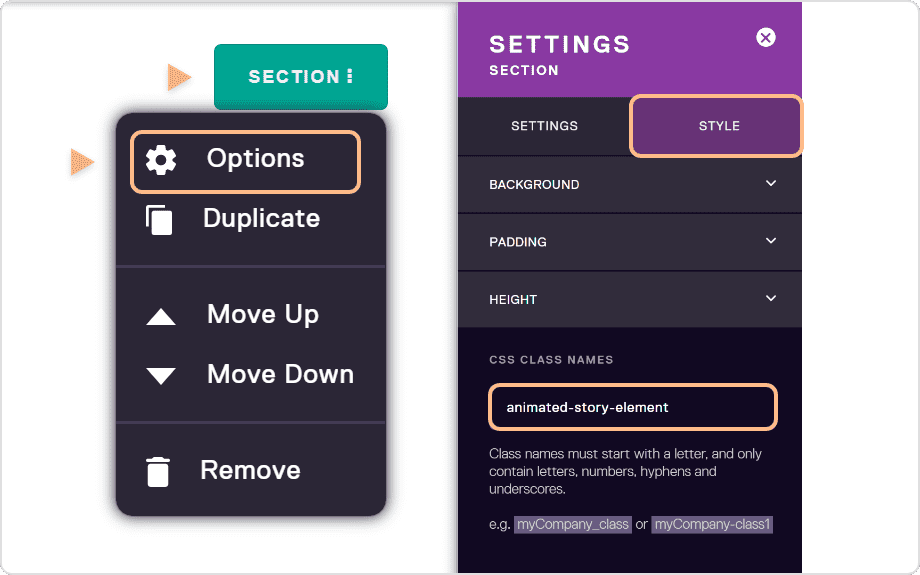
Note: first CSS Class Name is: animated-story-element
<script type="text/javascript">
    cb(function() {
    loadScripts([
        "https://revcbsi-a.akamaized.net/2016/Q3/22384/scrollMonitor.js"
    ], function () {
        var isMobile = window.matchMedia("only screen and (max-width: 760px)");
        if (isMobile.match || isMobile.matches) {
          return; //prevent animation on mobile devices
        }
        $('.animated-story-element').each(function(i, element) {
            var watcher = scrollMonitor.create(element, {top: -$(window).height() * 0.1, bottom: -$(window).height() * 0.2});
            watcher.enterViewport(function() {
                $(element).addClass('animated-visible');
            });
        })
    });
  })
</script>
Script block for effects with delay
Note: first CSS Class Name for this group is: sec-animated-element
<script type="text/javascript">
    cb(function() {
    loadScripts([
        "https://revcbsi-a.akamaized.net/2016/Q3/22384/scrollMonitor.js"
    ], function() {
        var isMobile = window.matchMedia("only screen and (max-width: 760px)");
        if (isMobile.match || isMobile.matches) {
          return; //prevent animation on mobile devices
        }
        $('.sec-animated-element').each(function(i, element) {
              var watcher = scrollMonitor.create(element, {top: -$(window).height() * 0.1, bottom: -$(window).height() * 0.2});
                watcher.enterViewport(function() {
                  setTimeout(function(){
                    $(element).addClass('animated-visible');
                  }, 2000);
                });
           })
        });
    })
</script>
3. Insert Style code below
<style>
     @media screen and (min-width: 760px) {
      .themed-account .animation-slide-left {
        left: -2000px;
        opacity: 0;
        transition: opacity 1s ease, left 1s ease;
    }

    .themed-account .animation-slide-left.animated-visible {
        left: 0;
        opacity: 1;
    }

    .themed-account .animation-slide-right {
        right: -2000px;
        opacity: 0;
        transition: right 1s ease, opacity 1s ease;
    }

    .themed-account .animation-slide-right.animated-visible {
        right: 0;
        opacity: 1;
    }
    .themed-account .animation-fade-in {
        opacity: 0;
        transition: opacity 2s ease;
    }

    .themed-account .animation-fade-in.animated-visible {
        opacity: 1;
    }

    .themed-account .animation-bounce {
        opacity: 0.2;
        transform: scale(0.5, 0.5);
        transition: transform 0.4s cubic-bezier(.91, .8, .54, 1.39), opacity 0.4s ease;
    }

    .themed-account .animation-bounce.animated-visible {
        opacity: 1;
        transform: scale(1, 1);
    }
  }
</style>
4. Insert Style code below
See the effects below, this is how they will appear in the story
This effect becomes visible when the element comes into your viewpoint
Slide left effect
Slide right effect
Fade in effect
Bounce effect
This effect will be visible 2 seconds after coming into your viewpoint
Delay slide left effect
Delay slide left effect
Delay fade in effect
Delay bounce effect